The Generation 2 Integra Club and those posting
these tips stress that performing these tips/tricks are at your own risk.
No one will be held liable for error / injury but yourself.
Advanced Timing.
Timing @18 deg BTDC works well... More power and MPG! However, you have to use Premium Fuel. Ignition timing should be 16 +or- 2 degrees BTDC. That means you can run the car reliably in 14 or 18 BTDC.
To advance your timing properly (as directed in the manual), you need a timing light. A timing gun with adjustable knob is recommended. I think you can borrow one from any auto parts store. And Yes, the way to advance your ignition is to turn the distributor counterclockwise (toward the firewall).
*NOTE: Before attempting this make sure you have high octane fuel 92 or better.
1) Since you will be turning the distributor to adjust, loosen the distributor housing bolts slightly (not the distributor cap screws).
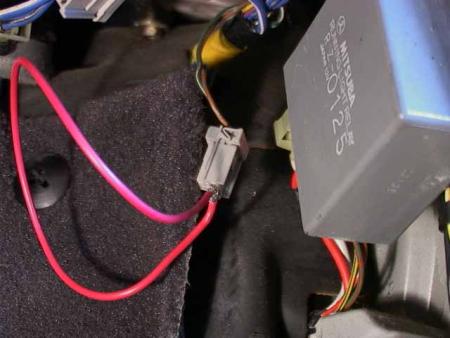
2) Find the "Timing adjustment connector" under the dash (passenger kick panel area). This connector has a green/white wire & a brown wire. You need to connect the two somehow (do not cut into the wires). Connect them by using a jumper wire (bent paperclip).
3) Start the engine and let it warm up to normal operating temperature.
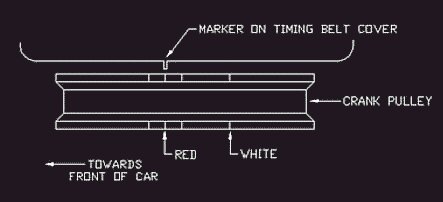
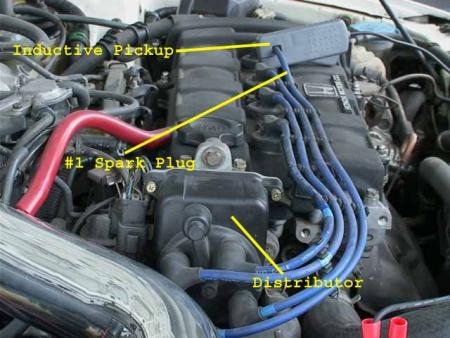
4) Connect timing gun. The timing light has connectors to your car battery (+ & -), and a Clip for hugging the #1 cylinder spark plug wire. Clip the Cyl#1 spark plug wire (dont disconnect wire from spark plug). Then, connect + & - to the car battery. The timing gun will emit a strobe light when the trigger is pulled. Locate the marker (aiming point) on the timing belt cover. It is located above the crank pulley and its the one you'll be aiming at.
5) Adjust the timing knob on the timing gun at +18deg. Aim the light down towards marker on timing belt cover and the crank pulley.
6) You should see the red timing line on the crank pulley. This is the line that you have to line up with the marker on the timing belt cover. With your left hand, turn the distributor until the timing line on the crank pulley lines up with the marker.
7) When both are aligned, tighten the distributor housing bolts, disconnect the timing light and your jumper wire under the dash. Done!
*Note: If you couldn't find the red mark on your crank pulley, you'll have to make it visible somehow. The marks sit inside grooves on the crank pulley. With motor off, I used a red pen to remark the timing line.
Romans
NOTES FROM THE AUTHOR
I personally believe that the current Teg Tip submission for fiddling with the
Integra's ignition timing is well explained. However, it can be improved upon
IMHO. Therefore, my version of this Teg Tip will be more of a supplement to the
first.
The first Teg Tip actually shows a good example of the 3 dash marks etched on
the crank pulley for timing reference - I strongly suggest that you read that,
and pay close attention to the figures shown in that writeup.
In this article, I will not go into any detail regarding octane requirements,
what's good, what's bad, etc. I will stick to only what needs to be done in
order to check & adjust your ignition timing. I will actually do a full
writeup on octane ratings and how it affects G2 Integras soon which I would like
for everybody to share their thoughts on. I just would not like to discuss that
here.
INTRO
Task: Check & Adjust Ignition Timing (or Advance Ignition Timing - for the
people that use the search button....hehehehehe).
Difficulty: Easy
Cars Applicable: 90-93 Integras (RS, LS, GS US & Canadian models) - more
particularly, cars fitted with the B18A1 engine. It MAY apply to GS-R models
fitted with the B17A and/or cars fitted with the B16A 1st Gen.
Car Used in This Guide: 1992 Integra GS 4dr. Auto w/a B18A1.
Tools Required
- 12mm box wrench
- Jumper Wire (Paper clip will do)
- Inductive Timing Light
When it comes to the Timing light, you don't have to go fancy. I bought mine for
$55CAN which was the cheapest available. You may opt to get ones that come with
Tachometers, but since G2 Integras come with a factory Tach., you don't really
need to spend on anything more fancy.
STEP 1
Please do the work in an open space with adequate air flow. You may suffer from
Carbon Monoxide poisoning as a consequence.
The first thing to do is to make sure that the engine is warmed up. Let the
engine warm up to normal engine temperatures (radiator fan should come on at
least once). Idle RPM should be at factory specs. (750RPM roughly).
Turn the engine off, and underneath the passenger-side kick panel, look for this
terminal (see Fig. 1). You may have to remove the plastic kick panel in order to
access it. Connect a jumper wire in the terminal to create a connection between
the green/white and brown terminal (see fig. 1).
Fig. 1 - Connect Green/White And Brown Terminal using Jumper Wire.
STEP 2
Open the hood. If you have not done any engine work in the past, familiarize
yourself with some of the engine components that will be discussed in this guide
(see fig. 2).
Hook up the Inductive timing light by connecting the positive jumper cable to
the positive battery terminal, negative jumper cable to the negative battery
terminal, and the inductive pickup on Spark Plug Wire #1 (see fig. 2).
Fig. 2 - Hookup Inductive Pickup on Spark Plug Wire #1.
STEP 3 - CHECKING IGNITION
TIMING
Turn on the engine. With the engine running, turn on the timing gun and point it
down the driver side where the engine pulleys are. Fig. 3a shows that you should
place the timing gun on the right hand side of the engine mount. This will give
your head enough space to peak down on the engine main pulley to see the timing
pointer (fig. 3b).
Here is the confusing part. Unfortunately, LL Cool B and I didn't have time to
turn the engine at TDC in order to see the 3 hash marks on the main pulley (and
thus couldn't take a pic). This is where you should refer to the first Teg Tip
regarding Advance Timing. That will show an excellent pictorial on where the 3
hash marks are located. I've quickly created an half-a$$ version of that (see
fig. 3c).
The 3 ||| marks are etched on the side of the main engine pulley. So, when you
point the timing light (make sure it is on of course) on the timing pointer
(fig. 3b), you should be able to see these 3 hash marks close to it.
Now, the middle hash mark refers to 16 deg. BTDC which is stock. The hash mark
closest to the passenger compartment is 14deg., and the hash mark closest to the
headlight is 18deg. What you need to do first, is to keep note as to where your
timing pointer is relative to these 3 hash marks before proceeding in adjusting
your timing. REMEMBER: To look at the timing pointer directly above it,
NOT on an angle. Otherwise, you will get false readings.
Fig. 3a - Where to position the timing gun.
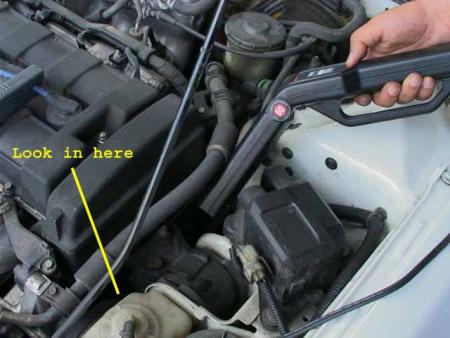
Fig. 3b - Where is that bloody Timing Pointer?
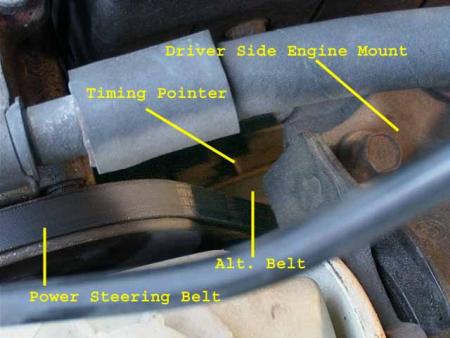
Fig. 3c - My poor attempt to show you the 3 hash
marks. The 3 ||| marks are the hash marks on the edge of the pulley.
Engine side
=====|||=======
| ALT. BELT HERE | Towards Firewall
==============
Fender side
STEP 4
If you are not satisfied with the current ignition timing of the vehicle, you
can adjust it. Fig. 4a and Fig. 4b shows the 3 hold-down bolts that hold the
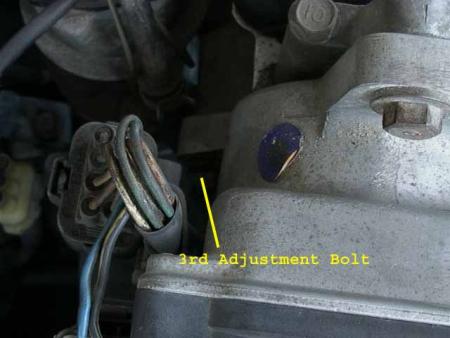
distributor in place. Yes, the third hold-down is hard to see on the pic, but
I've shown you the general location and it will look exactly the same as the
rest of the hold-down bolts.
Before you touch these bolts, you might want to turn off the engine first just
to be on the safe side (in case the wrench slips and/or falls, at least it
doesn't have a running engine to deal with![]() ).
).
Using a 12mm box wrench, LOOSEN these 3 bolts. Do not Remove them.
Fig. 4a - The first 2 hold-down bolts
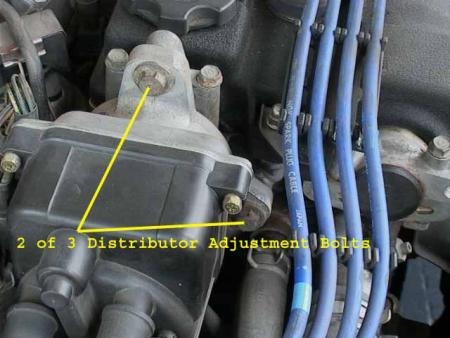
Fig. 4b - The 3rd hold-down bolt. It's there
somewhere ![]()
STEP 5 - ADJUSTMENT
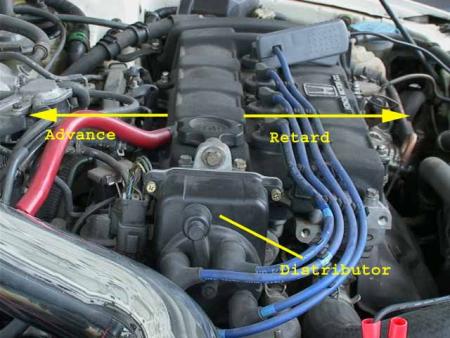
Once the 3 bolts are loose, turn the engine back on. In order to adjust the
timing, you must turn the distributor. Fig. 5 shows you which way to turn the
distributor in order to achieve an advance or a retard in timing.
Fig. 5 - Which way to advance or retard.
STEP 6
Once you are happy with your desired timing setting, temporarily tighten the top
hold-down bolt and recheck the timing (to make sure the timing is still
correct). You may then proceed tightening the rest of the bolts (turn off the
engine if you do not feel comfortable). Once all 3 are tightened (DO NOT OVER TORQUE),
recheck the timing again and adjust if necessary.
Do not forget to remove the jumper wire underneath the passenger side kick
panel. Undo the timing light and close the hood. Take the car for a spin.
CONCLUSION
Yes, I did not discuss as to how far you should advance your timing, what gas to
use, etc. Like I said, I will discuss that in another post because I believe
that it will be a good debate topic. If the images do not show, you may visit
the album at Imagestation here:
http://www.imagestation.com/album/?id=4291593117
N FUL FX - I hope you can append this to the existing Teg Tip about ignition
timing. Thanks.
Any questions/comments, either post 'em here or email me at [email protected]
Please type on the subject line, "RE: Integra Ignition Timing" or
something to that effect as I get a lot of junk mail.
Regards,
-OZ
[email protected]
Thanks LL Cool B - For using his car as a
guinea pig
====================
When torquing the distributor mounting
bolts (12mm), make sure you pay attention to the 17 lb-ft limit. If you don't
already have a torque wrench, it's time to pick one up.
Also... when advancing or retarding your timing, it may be easier to 'move' the
distributor by putting a thick cloth or towel over a medium sized wrench and
'tap' lightly in the direction your want to adjust (i.e. towards the windshield
to advance or towards the headlights to retard).
I am not sure if Oz mentioned this or not, but to keep things simple is
important. After you have jumped the service connector under the pass. side
dash, make sure that the timing light is connected properly (you should see the
'flashes' show up on the check engine light on the dash.
One more in the name of simplicity... Get the nose of the gun as close to the
hash marks as you can -- it will make them more visible. The stock 16 deg BDC
setting is the RED mark (if that helps).
-NEEX
� G2IC.com 1997-2002. All Rights Reserved.